")
")

Floppy image
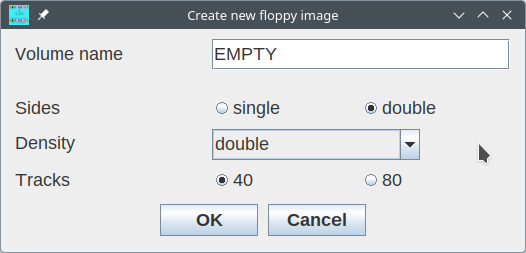
Still, a floppy disk file system must be set up, so this requires a volume name, and geometry data. You have to decide whether this is a single-sided or double-sided floppy disk, and what density to use: single, double, high, ultra, or double-16 (which is used with the TI-99/8 or with original TI double density controllers). Also, you have to set the number of tracks (40 or 80). All these data determine the capacity of the floppy disk.
For maximum compatibility, you should use double-sided / single density (DSSD) formats, which delivers a 180 KiB floppy disk. Most advanced disk controllers (BwG, CorComp, Myarc) support double density, which means 360 KiB. Some extensions for the TI floppy controller allow you to use 80 track disks, so you can take this option.
You can also press Ctrl-N to invoke this function.
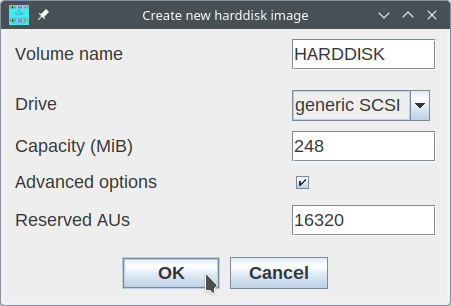
Hard disk image
Similarly to the floppy creation, you can set up a hard disk image in memory. When you save the image, you will have the chance to decide which image format to use.
This function is also available by Ctrl-M.
There are two major kinds of hard disk images: those used with the Myarc HFDC (Hard and Floppy Disk Controller) which are called MFM drives, and those for SCSI controllers (like WHTech or ASCSI). The SCSI images can be used with the IDE controller from Thierry Nouspikel and the DSR from Fred Kaal as unpartitioned images. There is a separate function to set up a partition table, described below. Since unpartitioned IDE images and SCSI images use the same file system and image formats, these IDE images will be displayed as SCSI even when they are used for IDE.
There is a checkbox which allows you to fine-tune the image creation for the respective type (Advanced options). In most cases, you can simply accept the default values.
SCSI
MFM
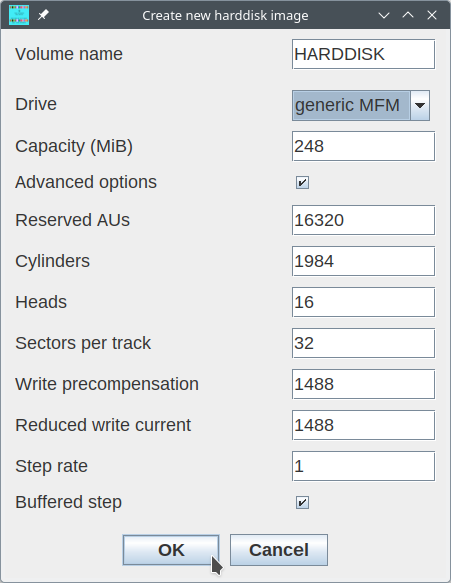
For the generic MFM layout, the options are calculated from the given capacity, that is, a geometry is chosen that delivers the desired capacity or approximates it.
Partitioned IDE image
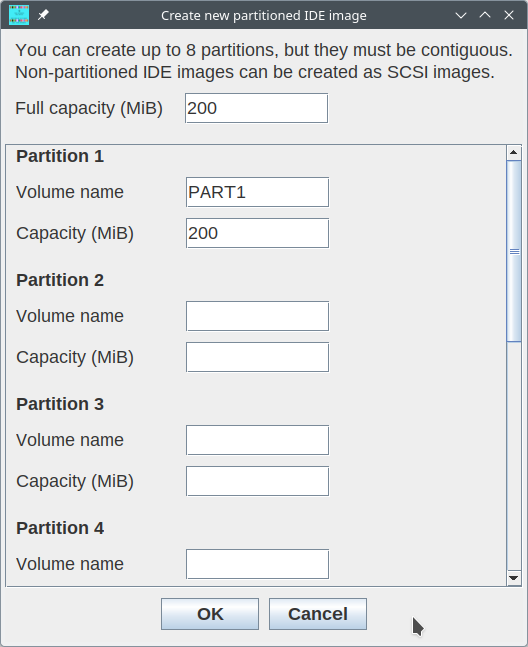
You have to provide the overall capacity of the IDE image (across all partitions). As we can define up to 8 partitions (with IDE DSR v15), the maximum usable size is 8*248 MiB = 1984 MiB.
The partitions must be set up contiguously, that is, you must not skip partitions. If you define 4 partitions, these must be 1 through 4.
TIImageTool suggests the partition size as the remaining space on the image. If you want to create more partitions, you have to change that suggestion to a smaller number.
After clicking on OK, the partitions are formatted, and the image is saved to your PC file system under a file name that you can choose in the file dialog.
The shortcut to this function is Ctrl-I.
CF7 image
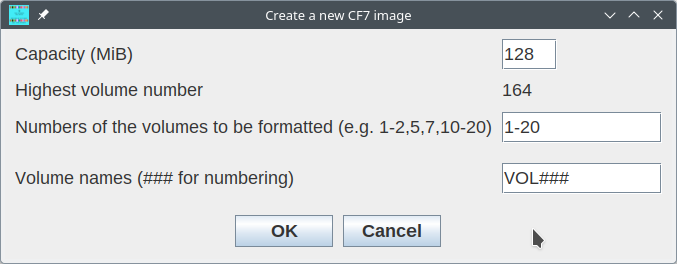
The CF7 image consists of equally-sized volumes of 400 KiB each. Logically, the volumes resemble floppy disks with 1600 sectors each. You can define as many volumes as fit on a CF7 image of the given size; after you specify the full capacity, the number of volumes is computed from it.
You do not need to format the whole CF7 image from the start. Maybe you start with 10 volumes and add more volumes later; this is possible with the "Edit CF7" function in the Utility menu. You can set up any volume in that space, and you can leave volumes undefined. For this, you can specify which volumes to format: x - y means to format volumes from number y to number y inclusively. Single volumes can be defined by their number. You can compose this specification in the entry field as you like.
All specified volumes are formatted after you click on OK. To assign a name to the volumes, you can type in a string in the last field. If you want the volumes to get numbered names (like VOL001, VOL002, ...), you may use the hash character as shown in the screenshot on the right.
Again, we have a shortcut: Ctrl-7.
Note: You cannot format a CF7 card with TIImageTool directly. Instead, you can create an image file that you have to write on the CF7 card after you saved the changes. For this, a separate tool is required like "dd" in Unix-based systems (typically part of the operating system), or the ported tool dd for Windows. The reason is that TIImageTool can access the CF7 card only with elevated privileges, which is inherenty dangerous for your data safety and security. For that reason, I leave it up to the special tools.